DIY VINYL FLOOR TILE
- Kaylee Parsons

- Apr 27, 2021
- 3 min read
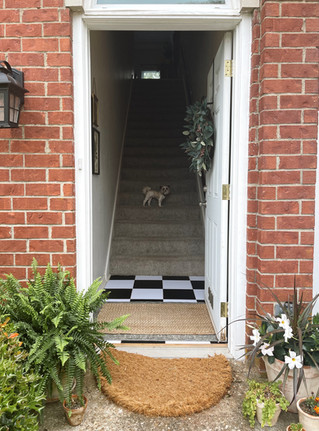
When renting a home flooring is one of those things that you can't really change. I HATED the tan tile at the foot of my front and back entry. I searched long and hard for a way to cover the tiles but everything was either too expensive or wouldn't properly fit the space. After a lot of research, I came across these 12 in. X 12 in. vinyl floor stickers for $19.99 on Amazon. I was obviously a little apprehensive about what the quality of the vinyl tiles would be, but after a 5 day trial period on my back entry- I am so impressed! The tiles were extremely simple to apply and have stayed REALLY well! So far they haven't peeled up, torn, or bubbled. They have been swept and walked on post being outside in the rain & seem pretty durable at this point!
*DISCLAIMER* The existing tiles that I applied the stickers on did not have any sort of sheen. They were a flat/matte tile with no shine or glaze. I am not sure how the tiles will apply to a glazed finish, but they did apply to the flat textured tiles very well. They are only $20 so I recommend sampling a small area first before applying to a larger area in case they do not stick to the tile that you have.
Here's a little before and after of the first space that I did!


What you will need:
-EZ Craft USA Permanent Adhesive Backed Matte Vinyl Sheets
12 in. X 12 in. - 40 Matte Black & White Sheets
-Ruler
-X-Acto Knife
-Cutting mat/piece of cardboard


Step 1)
Before I got started sticking my vinyl tiles- I made sure to clean the existing tile flooring REALLY WELL. If the floors are dirty the vinyl will collect the dirt and not cling to the flooring. Make sure to sweep and mop- then give the floor plenty of time to dry.
Step 2)
I started with the center tiles first. It's much easier to begin with the full 12 in. X 12 in. tiles because they do not require any trimming. Try to line the stickers up as close as you can with the existing tile- the stickers stick MUCH better to the tile than they will to the grout if you get off on your placement. You want to be as close as possible! When I did my back entry way the tiles seemed to be aligned pretty well, however, on my front entry I noticed the tiles weren't completely even. I went ahead and continued lining up with the tile itself. Even though they weren't as perfectly straight as I hoped- you can't tell once the entire room is done! I would start with the corners of the sticker closest to the previous sticker that I laid and made sure to slowly lay it down working out any air bubbles or creases. The stickers are pretty forgiving so don't stress if you need to lift it up and stick it again. (I did this multiple times).


Step 3)
Once you have the full tile stickers placed you will then begin working on the outside edges of the room. This is where your ruler and X-Acto will come into play! The back of the tiles have grid lines on them which makes this step pretty simple! To ensure I cut on the correct line I would place my sticker over the existing tile and fold along the wall making a mark along the line I was cutting. To avoid cutting something I wasn't supposed to or ripping the vinyl stickers I laid, I made sure to do all of my cutting on top of a piece of cardboard! I will say that the corners of the room are the most tricky- I ended up saving those for last. Here is a time lapse of this step:
That's all there is to it! It really is that easy!
I have officially done my front and back foyers and plan to do my bathroom- I will post another review of the bathroom after installing and living with them for awhile. I am anxious to see how they will hold up with more moisture.


Comments