DIY AGED TERRA COTTA POTS
- Kaylee Parsons

- Mar 23, 2021
- 2 min read
Updated: Mar 29, 2021
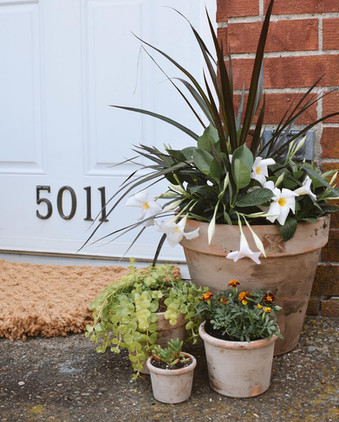
I love the look of aged planters and the way that the worn exterior changes the style from clean to lived in. This DIY is surprisingly simple, cheap, and nearly impossible to mess up.
What you will need:
Terra cotta Pots
Garden Lime
Paint Brush
White & Black Craft Paint
Sand Paper
Paper Plate/Bowl
Paper Towels
Matte Finishing Spray (Optional)

Step 1)
Pour Garden Lime onto a paper plate or bowl. Add a small amount of water and mix with your paint brush. I start with a very small amount of water and add as I see fit. You want the consistency to vary when applying it to the pots. As you can see there is a very thin area with runny water verses a thicker muddier area of the plate- this is good! In order to make the aging look more natural I think it is important to have areas where the mixture is applied with the thinner water and the mud.


Step 2)
Using your paint brush begin to brush on your Garden Lime mixture. As you can see below I used both the runny water and the mud. The areas covered with the thinner liquid will show more of the original terra cotta color while the mud will be much more opaque. During this step I tried to alternate brush strokes and apply the mud to create texture and color variation on the pot. It dries very quickly so don't be afraid to let it dry and then add another layer as you see fit!


Step 3)
Apply a small amount of white and black craft paint to a paper plate. You will not need much at all! Fold a paper towel to create a small square and gently dab the edge in the paint. To remove any excess paint dab the paper towel on the plate a few times before applying it to the pot. For this step, I tried to use VERY LITTLE paint and a light hand. However, if you do apply too much- don't sweat it! You can always sand down the paint!


Step 4)
Using your sand paper begin sanding down small areas of the pot. Typically, I would start with the rims or edges and go from there. The more that you sand the more the terra cotta will show through. This step also comes in handy if you accidentally applied more paint than you were hoping for! (Which I did several times!)


Step 5) *optional*
If you are hoping for your pots to stay exactly how they look when you are finished you can spray them with a matte finishing spray. (I would stay away from gloss to avoid any shine!) This will keep the pots from wearing down further due to watering or weather. However, I did not seal my first round of pots and they still look great. I love the natural eroding that has taken place. They have weathered two storms now and still look how I intended.
Again, these pots have not been sprayed with any type of finishing spray.


Step 6)
Let your pots dry completely before planting!

Step 7)
Time to plant! I love the way that these turned out. Such a fun and affordable way to bring life to your home.


Comments